

Iridology and sclerology online
How to photograph your own eyes, wherever you are in the world
You do not need to be in the same room as your practitioner to have an iridology and sclerology reading. With a phone camera, a helper and good daylight, you can take everything Sue needs from your own kitchen table — which is how clients across Australia, the U.K, the United States and indeed around the world have their eyes read.
Here is how it works. Book a one-hour initial online consultation with Sue Kira at True Vitality, then send through ten photographs of your eyes beforehand (min). They are checked on arrival so anything unclear can be retaken in good time, and you and Sue then go through them together during your appointment. Best to send via DropBox or similar as emails often won’t carry large size images.
What you’ll need
- A helper. These shots are very difficult to take on yourself.
- A phone camera. No special equipment is needed.
- Good light. Natural daylight near a window is ideal.
Before you start
Please turn the flash off. It bleaches out the very detail I am looking for. If the light is low, have your helper hold a lamp or a second phone torch off to one side rather than shining straight into the eye, and keep direct sunlight out of the eyes.
No eye makeup, please, and no coloured or decorative contact lenses. Clear lenses are usually fine, but do let me know you wear them. Glasses off, and clean the camera lens — a smudge is the most common cause of a soft photo.
Get the camera close enough that the eye fills most of the frame, but not so close that it cannot focus — most phones focus from about 10 to 15 centimetres. Tap the screen on the iris to set the focus before each shot.
The areas I am looking at

The coloured part of the eye is the iridology pictures. The white of the eye is the sclerology pictures, and I need to see it in four separate sections, because each part of the eye is only visible when you look away from it.
The ten shots
Five shots for each eye — ten in all. For each one, open the eye as wide as you can. Most people need to use a fingertip above and below the eye to hold the lids apart.
Shots 1 and 2 — right iris, left iris. Look straight at the camera with the eye wide open, so the whole coloured part is visible.
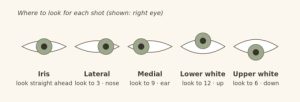
Shots 3 and 4 — right lateral, left lateral. This is the white on the outer side of the eye, closest to the ear. Look towards your nose: 3 o’clock for your right eye, 9 o’clock for your left.
Shots 5 and 6 — right medial, left medial. The white closest to the nose. Same technique, but look the opposite way, out towards your ear: 9 o’clock for your right eye, 3 o’clock for your left.
Shots 7 and 8 — lower whites, both eyes. Gently pull the skin below the eye downwards and look up to 12 o’clock. No need to hold the upper lid for this lot.
Shots 9 and 10 — upper whites, both eyes. Lift the skin of the upper eyelid towards the eyebrow and look down to 6 o’clock. No need to hold open the lower lids for this lot.
Where to look for each of the five shot types.
A quick word on the clock positions: they are described the way I see them in your photograph, which is why they swap over between the right and left eye. If you are ever unsure, follow the plain-language cue instead — nose, ear, up or down. That will always be right.
Checking the shots before you send them
Have a look at each photo on the largest screen you have — detail disappears on a small phone preview. You are looking for ten clear images that show the whole of each section. A tiny bit of softness is workable in sclera images, but the clearer the better.
Make sure every shot includes the inner corner of the eye. That is how I tell one eye from the other once the photos are on my screen.
Take a few extras of any that are tricky and send the best of them.
If the photos aren’t clear enough
Photos are checked for quality on arrival. If any of them are too blurry, too dark, or do not show enough of a section, Sue will let you know which ones to retake and you can send them back through before your appointment. This is the only reason the photos are asked for in advance — there is plenty of time.
Sending your photos
Email them to sue@truevitality.com.au, or via DrpBox or similar at least 48 hours before your appointment, as the full-size original files rather than compressed copies or screenshots. Naming each one — “right-lateral”, “left-upper” and so on — makes everything easier at the other end.
How your photos are kept
Your eye photographs are part of your confidential health record. They are stored securely in Sue’s password-protected practice management system, along with the rest of your file, and are never shared with anyone else, published, or used in teaching or marketing material without your written permission. You are welcome to ask for them to be deleted at any time.
Ready to book?
Initial online consultations run for one hour and can be booked through the True Vitality website, or by emailing sue@truevitality.com.au, or use the contact form. If you have a question before you book, you are very welcome to ask. Booking link Click here.